Disclosure: This post may contain affiliate links. As an Amazon Associate, we earn from qualifying purchases—at no extra cost to you.
For me, cherry pie isn’t just dessert—it’s a snapshot of summer that lasts all year round. I remember my first cherry pie like it was yesterday. I was twelve, standing barefoot in my grandma’s kitchen in Georgia. We’d just picked cherries from her tiny backyard tree. They were still warm from the sun, and we popped them into a bowl quicker than cicadas could buzz. She didn’t follow a strict recipe, just a bit of this and a handful of that. But the result? Pure magic.
Now decades later, my approach still honors her flair—simple ingredients, personal flair, and letting the cherries shine. These days, I might use frozen cherries when fresh aren’t in season, and I’m not ashamed to break out a store-bought crust when time’s tight. Life’s too short to sweat every detail—especially when the end goal is a homemade cherry pie that gets people gathering around the table.
This article will walk you through everything you need to bake the perfect cherry pie. From selecting the best cherries to thickening your filling like a pro, we’ll cover techniques, clever tweaks, and everything in between.
My Cherry Pie Philosophy: A Homestyle Classic with Tang
Sweet Memories in Every Slice
There’s something universally comforting about slicing into a warm cherry pie. It’s festive, timeless, and you can serve it at just about any occasion—picnics, holidays, or just because it’s Thursday. Unlike more fussy desserts, cherry pie embraces messiness. A little juice bubbling over is seen as character, not a mistake.
That balance of sweet and tart is what makes it special. I’ve experimented with countless cherry variations to nail that balance. Whether it’s sour Montmorency cherries for a punch or a blend using frozen dark cherries for backup, the result should burst with flavor.
Why Cherry Pie Deserves a Spot in Your Repertoire
Cherry pie may sound like an old-school dish, but it’s having a moment again—thanks to social media platforms showing us new, fun twists. I’ve even tapped into viral no-bake cheesecake ideas for layering flavors. For instance, combining cherry topping over cheesecake bars adds depth with very little extra effort, making dessert both rustic and modern.
Whether you want to keep things classic or mix it up into cheesecake-inspired cherry mashups, mastering a straightforward cherry pie recipe keeps your options endless.
How to Make a Classic Cherry Pie from Scratch
Ingredients List
Here’s everything you’ll need, along with some suggested tweaks depending on what’s in your pantry or freezer:
| Ingredient | Quantity |
|---|---|
| Pitted cherries (fresh or frozen) | 4 cups |
| Granulated sugar | 1 cup |
| Cornstarch (thickener) | 4 tablespoons |
| Lemon juice (fresh-squeezed) | 1 tablespoon |
| Vanilla extract (alcohol-free) | 1 teaspoon |
| Pie crust (homemade or store-bought) | 2, for top and bottom |
Note: You can swap sugar with organic cane sugar or monk fruit sweetener, and cornstarch with arrowroot powder for a gluten-free option. If you’re looking for a reliable cherry pitter to breeze through prep, try this stainless steel one on Amazon.
Timing Breakdown
Making this cherry pie from scratch doesn’t require all day. Here’s a clear breakdown:
| Step | Duration |
|---|---|
| Preparation | 20 minutes |
| Cook Time | 50 minutes |
| Cooling Time | 2 hours |
While the cooldown matters—juices set and flavors mingle—it’s a waiting game that’s well worth it.
Step-by-Step Instructions
- Preheat your oven to 400°F.
- If using store-bought crusts, let them sit out briefly; they’ll be easier to unfold.
- In a large mixing bowl, combine the cherries, sugar, lemon juice, vanilla, and cornstarch. Stir gently but thoroughly.
- Line your pie dish with the bottom crust. Press it flat without stretching.
- Pour in the filling, then top with the second crust. Crimp the edges and cut a few vents in the top.
- Bake for 20 minutes at 400°F, then reduce to 350°F and bake another 30 minutes until the crust is golden and bubbly.
- Cool completely on a rack for at least 2 hours.
Pro tip: Place a baking sheet under the pie to catch any drips and avoid mess. For knife-edge precision slices, this handy non-slip pie server is a game-changer.
Cherry Pie Filling Tips & Best Ingredients
How to Thicken Cherry Pie Filling Right
A soggy bottom crust or runny filling can ruin the moment. The right thickener solves that. Cornstarch is my go-to because it thickens without dulling flavor. But flour or tapioca can also step in.
For extra firm filling, pre-cook about half the cherry mix with the cornstarch before adding it to the crust. This technique is recommended by the USDA as it helps eliminate raw starch flavor and produces more consistent results (source).
Another smart move? Chill the filled pie crust for 15 minutes before baking. This sets the fats and helps prevent overflow.
Selecting the Best Cherries
The best pies start with the best cherries. Tart cherries like Montmorency are traditional. They’re bright, bold, and balance sweetness perfectly. If you’re keen on a richer, deeper flavor (and less sugar), frozen dark cherries are excellent—especially when fresh aren’t available.
You can absolutely use frozen cherries for pie. Just thaw and drain them well. Don’t toss the juice—simmer it down, sweeten it slightly, and drizzle it over your slice as a side sauce.
For a handy shortcut, you can always reach for canned cherry pie filling, but be mindful of added sugars. Or blend canned with fresh for a happy in-between.
Internal bonus: Pair that slice with a dollop of vanilla no-bake cheesecake for extra flavor and texture contrast.
Advanced Cherry Pie Techniques and Variations
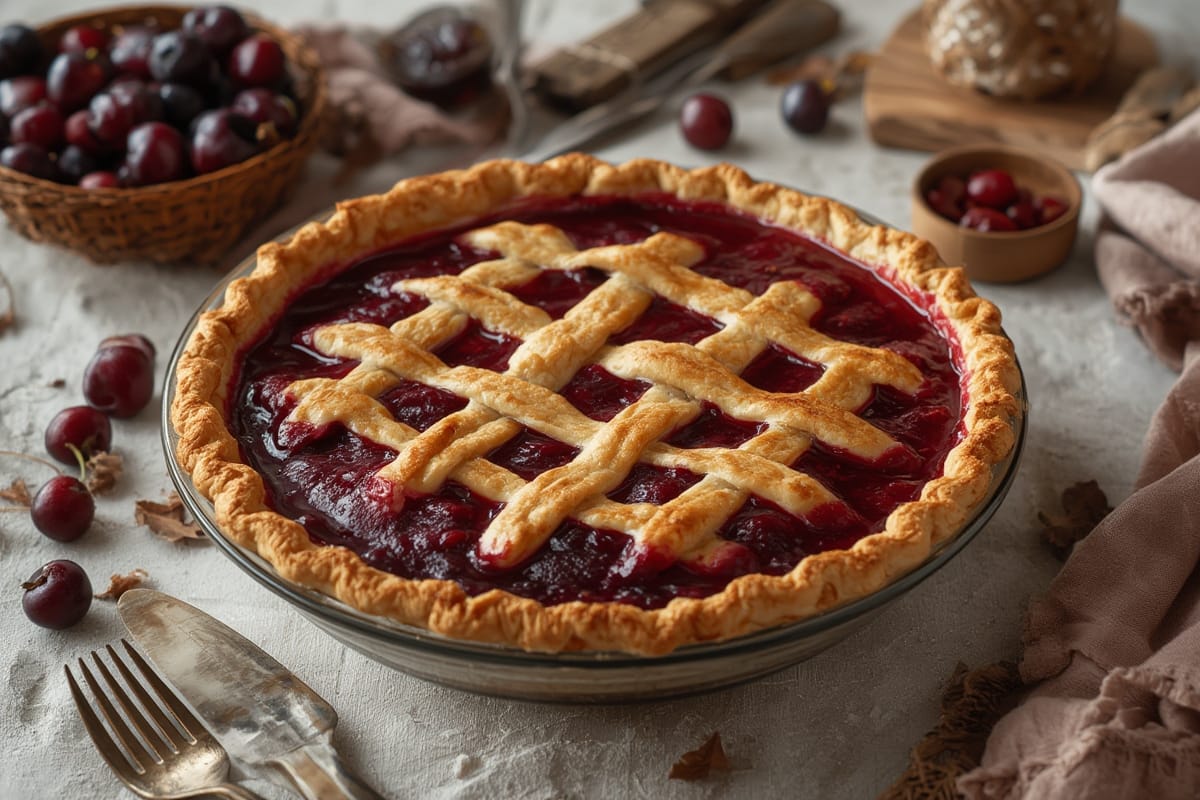
Lattice, Streusel, and Other Crust Styles
The look of your pie matters, especially if it’s the star of the table. A traditional top crust is classic, but you can also go creative. Try a lattice (a basic pastry wheel like this helps) or even a Dutch crumble topping using oats and brown sugar.
Each style offers different textures. Lattices allow more venting, ideal for juicy fillings, while streusel adds sweetness and crunch.
Modern Twists: Spicing and Layering
Get playful. A pinch of cinnamon or cardamom in the filling can elevate the cherry profile. Add almond extract sparingly to mirror flavors from classic cherry-almond pairings.
Alternatively, layer warm cherry pie filling between cheesecake bars or roll them into cherry dessert bars for elevated handheld treats.
Prefer bite-sized pies? Mini cherry tarts made in a muffin tin not only reduce bake time but are perfect for gatherings.
FAQs About Cherry Pie
Should cherry pie be refrigerated?
Yes, after it cools. Store it covered in the fridge for up to 5 days. It helps preserve freshness and flavor, especially in warmer climates.
Can you use frozen cherries for pie?
Absolutely! Just thaw and drain them. You may need to adjust the thickener (add 1 extra tablespoon of cornstarch) since frozen cherries release more moisture.
How do you thicken cherry pie filling?
Cornstarch is ideal. Use 1 tablespoon per cup of cherries. Pre-cooking the mixture also helps control the outcome and reduces weeping.
What cherries are best for pie?
Montmorency tart cherries are traditional. Sweet cherries like Bing can be used, but mix with lemon juice for balance. Frozen tart cherries are reliable year-round.
Conclusion: Celebrate Simplicity with Every Slice
Cherry pie isn’t just dessert—it’s a warm hug from the past, wrapped in golden buttery crust. Whether you’re making it on a lazy Sunday or showcasing it at a holiday table, it’s guaranteed to spark conversation and comfort alike. The best part? You don’t need a culinary degree to master it. Just some good cherries, a hot oven, and a little love go a long way.
Ready to explore more creative takes? Let recipes like vanilla swirl cheesecake bars inspire future cherry pairings—you’ll be surprised how well this humble pie plays with other sweet sensations.
PrintHomemade Cherry Pie
- Total Time: 2 hours 10 minutes
- Yield: 1 9-inch pie 1x
Description
A classic cherry pie with a vibrant, tangy filling and buttery crust—perfect for any season, using fresh or frozen cherries.
Ingredients
4 cups fresh or frozen pitted cherries
1 cup granulated sugar
4 tablespoons cornstarch
1 tablespoon fresh lemon juice
1 teaspoon vanilla extract (alcohol-free)
2 pie crusts (top and bottom, homemade or store-bought)
Instructions
Preheat oven to 400°F.
Combine cherries, sugar, cornstarch, lemon juice, and vanilla in a large bowl.
Line pie dish with bottom crust and fill with cherry mixture.
Top with second crust, seal edges, and cut vents.
Bake at 400°F for 20 minutes, then reduce to 350°F and bake for 30 more minutes.
Cool on rack for at least 2 hours before serving.
Notes
Use pre-cooked filling for thicker results.
Try lattice or streusel topping for variety.
Pairs wonderfully with dairy-free whipped topping.
- Prep Time: 20 minutes
- Cook Time: 50 minutes
- Category: Dessert
- Method: Baked
- Cuisine: American
Nutrition
- Calories: 320
- Fat: 15g
- Carbohydrates: 45g
- Fiber: 3g
- Protein: 2g
- Cholesterol: 0mg
Keywords: cherry pie, classic pie recipes, tart cherry dessert