Disclosure: This post may contain affiliate links. As an Amazon Associate, we earn from qualifying purchases—at no extra cost to you.
Making an apple pie isn’t just about mixing fruit and dough—it’s about filling your kitchen with comfort, your table with joy, and your story with flavor. For me, it all began in Grandma Lucille’s kitchen in Pine Mountain, Georgia. Every fall, she’d handpick apples from the local orchard, and I’d help her slice them thin while she hummed hymns and dusted cinnamon like magic snow. The house smelled like pure love.
These days, my approach to APPLE PIE is a little more adventurous, but the heart remains the same. Whether I’m blending tart Granny Smiths with sweet Pink Ladies or sneaking a dash of cardamom into the filling, I treat each pie as an homage to the past—with a wink to the now. This article breaks it all down: from the flaky crusts to foolproof fillings, quick tricks to avoid soggy bottoms, and all the ways you can make this American staple your own.
The Soulful Start to Making Apple Pie
Apple Pie and Southern Sundays
Every slice tells a story, doesn’t it? Sunday dinners in my family were sacred. The kind of sacred that stopped time. And APPLE PIE? It wasn’t just dessert—it was the grand finale. Grandma Lucille’s was deep-dish and packed with spice, acid, and buttery layers. We didn’t need whipped cream on top. The pie spoke for itself.
When I later trained in New Orleans, I learned the technicals—folding a pie crust just right, macerating apples for balance, tweaking sugar to let fruit shine. But it wasn’t until I moved to Austin and began creating my own version that the magic clicked. Playing around with spice blends, experimenting with different apples, and adding modern takes gave me a new lens. APPLE PIE doesn’t have to be predictable—it just has to be real.
The Real Secret? Letting the Fruit Lead
The power behind any good apple pie begins with its star ingredient: the apples. While store-bought pies often taste flat or overly sugary, my advice is trust the fruit. Combine tart textures with bold flavors. Toss them lightly to preserve structure during baking.
To keep things exciting, I finish mine with a rustic crust glaze (made from non-alcoholic orange juice and raw sugar) that gives it crunch and a golden glow. I’ve recommended this trick in my quick chicken recipes article too—shine matters, even in weeknight meals!
And while we’re talking comfort fare, my easy chicken recipes lineup also celebrates that same balance of history and innovation. Because whether it’s savory or sweet, food should always make you feel something. Now let’s make a pie that speaks for itself.
Ingredients, Timing & How to Bake the Perfect Apple Pie
Ingredients List
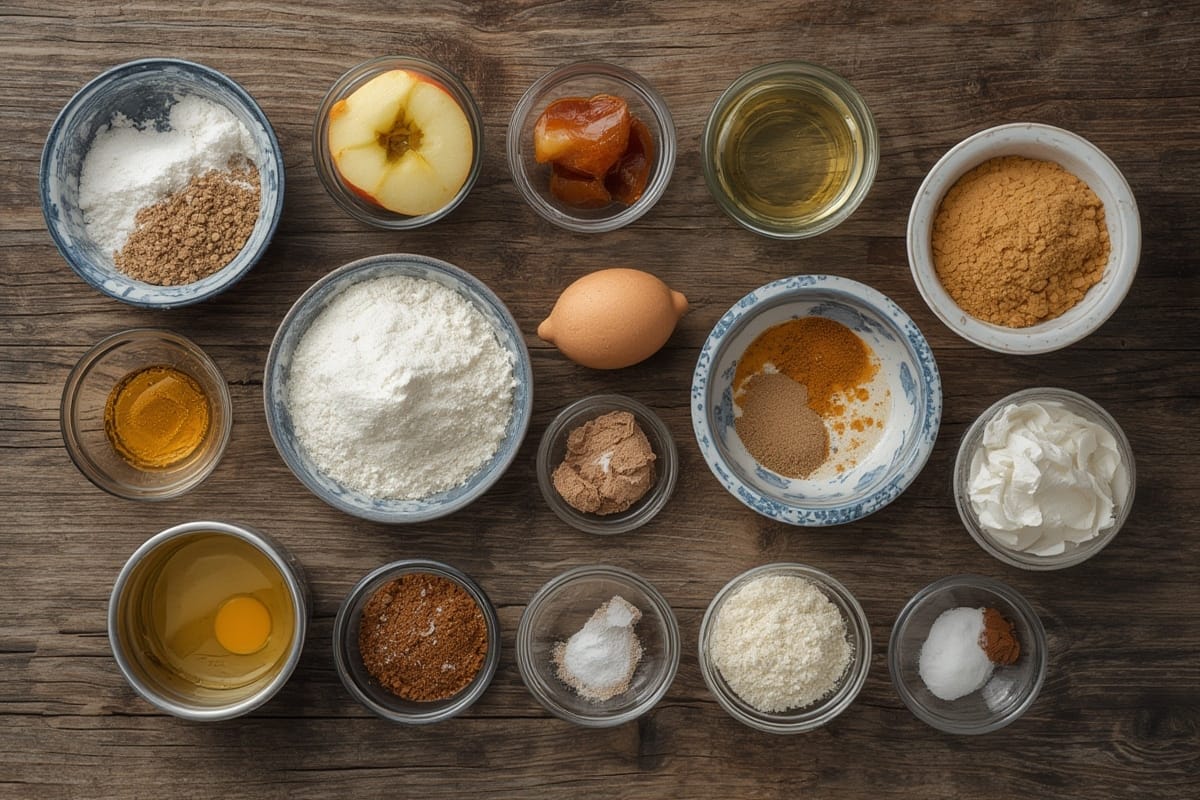
Before anything, assemble your arsenal. Here’s what you’ll need for the most luscious apple pie ever—feel free to switch it up based on your pantry or personal taste:
- 6 cups of peeled, sliced apples (Granny Smith, Honeycrisp, or Pink Lady work best)
- ¾ cup raw cane sugar (adjust based on apple variety)
- 2 tablespoons flour (you can sub cornstarch for gluten-free)
- 1 tablespoon lemon juice
- ½ teaspoon cinnamon
- ⅛ teaspoon nutmeg
- Pinch of cardamom (optional but delightful)
- 1 tablespoon non-alcoholic orange juice or apple cider (for extra brightness)
- 2 tablespoons butter (cut into small dots)
- 1 prepared double-crust pie dough (homemade or store-bought)
- 1 egg yolk mixed with 1 teaspoon water (for egg wash)
- Turbinado sugar (for topping)
Want pro tools to get that job done cleaner and faster? I use this high-quality apple slicer and corer, and to roll out the perfect crust, I swear by this adjustable rolling pin. Makes life a breeze.
Timing
This apple pie doesn’t take all day—but it will taste like it did.
| Task | Time |
|---|---|
| Prep Time | 25 minutes |
| Bake Time | 50 minutes |
| Cooling Time | 2 hours |
| Total Time | 3 hours 15 minutes |
Step-by-Step Instructions
Preheat your oven to 425°F. Roll out the first crust and fit into a 9-inch pan. Leave the excess hanging, don’t trim yet.
Toss your apple slices in sugar, flour, lemon, cinnamon, and nutmeg. Let this sit for 15 minutes—the apples will get juicy and flavorful.
Spoon the apple mix into the crust. Dot with butter. Place the second crust on top, crimp edges, and cut vents—or weave into a lattice.
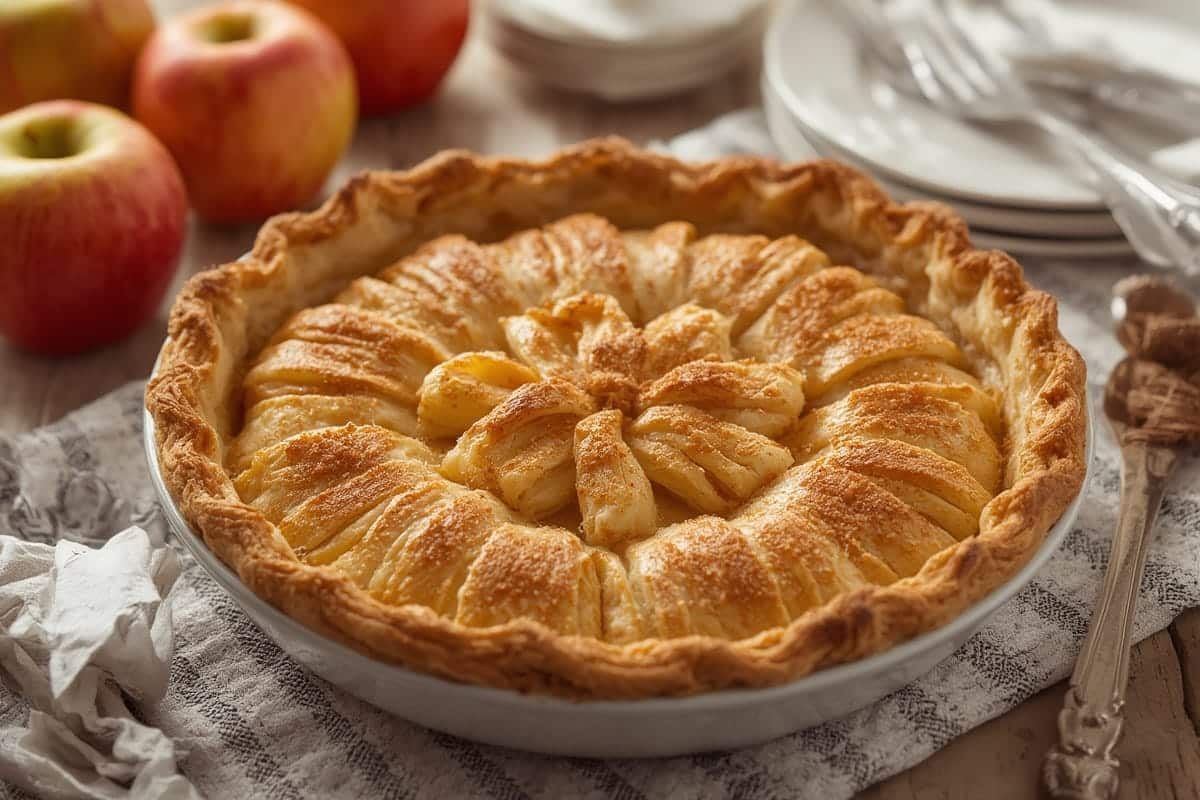
Brush egg wash over the crust and sprinkle with raw or turbinado sugar. You’ll get that golden crunch.
Cover the edges with a pie shield or foil to avoid over-browning.
Place on a foil-lined baking sheet and bake 20 minutes. Then lower the oven to 375°F, uncover edges, and bake 30 minutes more.
Once bubbling and golden, remove and cool at least 2 hours. This prevents filling spillout and soggy bottoms.
Flaky Crusts and Filling Hacks for Every Baker
How to Keep Your Crust Flaky
The #1 mistake in apple pies? Soggy bottoms. To avoid this, keep everything cold—especially your fat, your dough, and even your flour. I recommend this ceramic pie dish, which retains heat evenly and reduces sogginess. Also, preheat a baking sheet in the oven before setting your dish on it for better base heat.
After adding apples, drain off excess liquid—don’t dump it all in. This prevents soupy messes. If you’re in a rush, use a par-baked bottom crust to get a head start on crispness, just like I suggest for my chicken casserole recipes, where texture balance is also king.
Creative Twists on Traditional Fillings
Classic apple pie doesn’t mean boring. Here are some spins:
- Add a handful of dried cranberries or chopped dates for depth.
- Use a touch of real vanilla bean paste for a floral lift.
- Want flavor without alcohol? Add a splash of non-alcoholic vanilla syrup instead of extract.
- Elevate the filling with a burst of citrus zest or a pinch of ground clove.
Scientific data from the USDA’s fruit storage guide shows that using firmer apple types like Fuji or Empire delays breakdown during baking. This helps retain great structure.
Storage, Reheating & Apple FAQs
How to Store, Reheat, and Keep It Good Longer
An apple pie is often best the day after. Store it covered on the counter for up to 2 days, then refrigerate after that.
For crisp results, reheat slices in an oven—not microwave. Bake at 300°F for 10 minutes. You’ll reactivate the sugar crust and avoid steaming the crust damp.
Another storage hack? Use a covered glass deep pie plate made for both baking and storing. Saves on dishes and keeps the pie fresher.
Answers to Common Apple Pie Questions
How do you keep apple pie from getting soggy?
Drain excess filling liquid before baking. Use a thickening agent like flour or cornstarch. Bake on a hot pre-heated sheet pan to ensure bottom crust cooks through.
What apples are best for apple pie?
A mix of tart and sweet apples gives the best flavor. Granny Smiths hold shape, while Honeycrisp, Braeburn, and Pink Lady apples offer sweetness and texture balance.
Should apple pie be refrigerated?
If you won’t consume it within two days, yes—pop it in the fridge. Cover with foil or plastic wrap to lock in freshness.
How long does apple pie last?
On the counter: 2 days. In the refrigerator: 4–5 days. In the freezer: up to 4 months if wrapped tightly (just thaw overnight in the fridge and reheat in the oven).
Conclusion: A Slice of Joy with Every Bite
There’s something grounding about baking an APPLE PIE from scratch. Whether it’s for a gathering or an ordinary Wednesday night, every detail—flaky layers, warmly spiced apples, golden crust—tells a story. You’re not just serving dessert. You’re serving love, memory, maybe even a little rebellion with that dash of cardamom.
From Southern Sundays to social media-inspired spins, let your apple pie represent your kitchen signature. Trust your apples. Bake with intention. And always, always save a slice for yourself.
PrintClassic Homemade Apple Pie
- Total Time: 3 hours 15 minutes (including cooling)
- Yield: 1 9-inch pie 1x
Description
This classic apple pie blends tart apples, warm spices, and a golden flaky crust for a nostalgic yet bold dessert that’s perfect for any occasion.
Ingredients
6 cups peeled, sliced apples (Granny Smith, Honeycrisp, or Pink Lady)
¾ cup raw cane sugar
2 tablespoons flour
1 tablespoon lemon juice
½ teaspoon ground cinnamon
⅛ teaspoon nutmeg
Pinch of cardamom (optional)
2 tablespoons butter, chopped
1 tablespoon non-alcoholic orange juice or apple cider
1 double-crust pie dough (store-bought or homemade)
1 egg yolk + 1 teaspoon water (for egg wash)
Turbinado sugar (for sprinkling)
Instructions
Preheat oven to 425°F and place a baking sheet inside.
Fit first crust into 9-inch pie plate. Let extra hang over.
In a bowl, toss apples with sugar, flour, lemon juice, cinnamon, nutmeg, cardamom, and juice. Let sit 15 minutes.
Spoon filling into crust. Dot butter on top.
Top with second crust, crimp edges, and cut steam vents.
Brush egg wash on crust. Sprinkle turbinado sugar on top.
Protect edges with a crust shield. Bake 20 minutes.
Lower to 375°F, remove shield, and bake 30 minutes more.
Cool fully (2 hours minimum) before slicing.
Notes
Mix apple types for a complex flavor.
Shield crust edges to avoid burning.
Use preheated baking sheet to ensure crisp bottom.
- Prep Time: 25 minutes
- Cook Time: 50 minutes
- Category: Dessert
- Method: Baked
- Cuisine: American
Nutrition
- Calories: 320
- Fat: 15g
- Carbohydrates: 45g
- Fiber: 4g
- Protein: 2g
- Cholesterol: 40mg
Keywords: apple pie, homemade apple pie, classic pie recipe, easy apple dessert